If you're here, it was by special invitation only!
Welcome!
Developing muscle memory! The Routine!
There are 4 sections to The Routine. It’s more like a workshop
than a tutorial. This is a hands on group of exercises that will
propel you ahead of where you are right now, to about 2 years
from now . . . but in only 90 days!
The sections are: Finger Exercises, Open Chord Exercises, Open
Chord Drills and Barre Chord Drills. But this tutorial series
will only cover the finger exercises and chord exercises.
Below you'll find the exercises, WITH audio backing tracks! You
can download them all at once in a zip file, or work them online
here. Your choice!
All the reasons WHY are answered in the previous tutorial,
Practice THIS! So, we’re just going to get right into it!
NOTE: There is a fair amount of reading before we start the actual
exercises! Once we start them, you'll have the audio clips to play,
and can practice them all right here online, or download them.
While you're reading, keep in mind, you only read this text ONCE!
You'll just be working on the exercises after you read this now!
So hang in there! Read it all once! It will move much faster
after that.
AND keep in mind, these exercises, done correctly, in order, as
often as you can play them, will literally take you from where you
are right now, to a place 2 to 3 YEARS ahead, to where you'll
possibly be in years from now, if you don't RE-LEARN how to learn,
and how to practice correctly!
I promise you, it's going to be worth it! And within a few short
weeks, you will see much improvement in your playing, AND in your
understanding!
NOTE: Before you begin this, you will need to make a commitment!
You need to do the routine DAILY for 4 weeks! And any days possible,
you need to do it 2 or 3 times! It takes very little time! You’re
setting up the ground work for something that is going to change
your life! You’re going to see dramatic improvements, IF you take
the 4 weeks required to prepare you for greatness!
Seriously! If you cannot do this daily, but can only do it at your
regular practice time, less than daily, IT WILL STILL YIELD RESUILTS!
But instead of taking 4 weeks, it will take some months.
The 4 weeks time is needed because you'll be building different
muscles than you have built right now. And you will be stretching
your hand and fingers a bit. It will be much more beneficial if
you can do this "routinely" for 4 weeks! After that, you can just
do the Routine before each regular practice session! Actually,
The Routine will BECOME your regular practice session!
You're going to quickly develope a ton of hand and finger strength!
Consistancy is the key element! Just give this one month, 30 days!
Daily, 1, 2 or 3 times a day!
Then continue working The Routine before each regular practice
session. And you will be 2 YEARS advanced from where you are
today, in 90 days!
Keep track of your practice sessions, and after each 7 sessions,
move on to the next week in the routine!
Building Muscle Memory and Hand/Finger Strength
The following finger exercises should be done daily, if possible.
They only take a few minutes. On days when you spend time
practicing, do these FIRST as a warm up. On days when you don’t
have a practice session, do these anyway! At least for WEEK 1 at
the very minimum! You need to give this a solid week’s work to
get it all started!
4 fingers, 1 2 3 4. 4 frets, 1 2 3 4. Put them together in every possible
combination. When you can play these simple 12 combinations, and
play them WELL, there is no scale, riff, solo, or chord you can’t
play!
NOTE: There are some scales and a handful of chord shapes that
require more of a stretch! You generally use 4 fingers to cover 4 frets.
And that covers most of the gamut. This Routine covers the “norm”.
We’ll save the stretches for another series. Most of you won’t be
playing chords or scales that require more than a 4 fret spread.
The whole set of exercises is all done the same way. Each week
the routine changes slightly, but only for the 1st few weeks!
So here is the first one to work on. Each one is done the same way.
From this minute on, you will be IN THE ROUTINE! You will
do the entire thing at the BEGINNING of EVERY practice session!
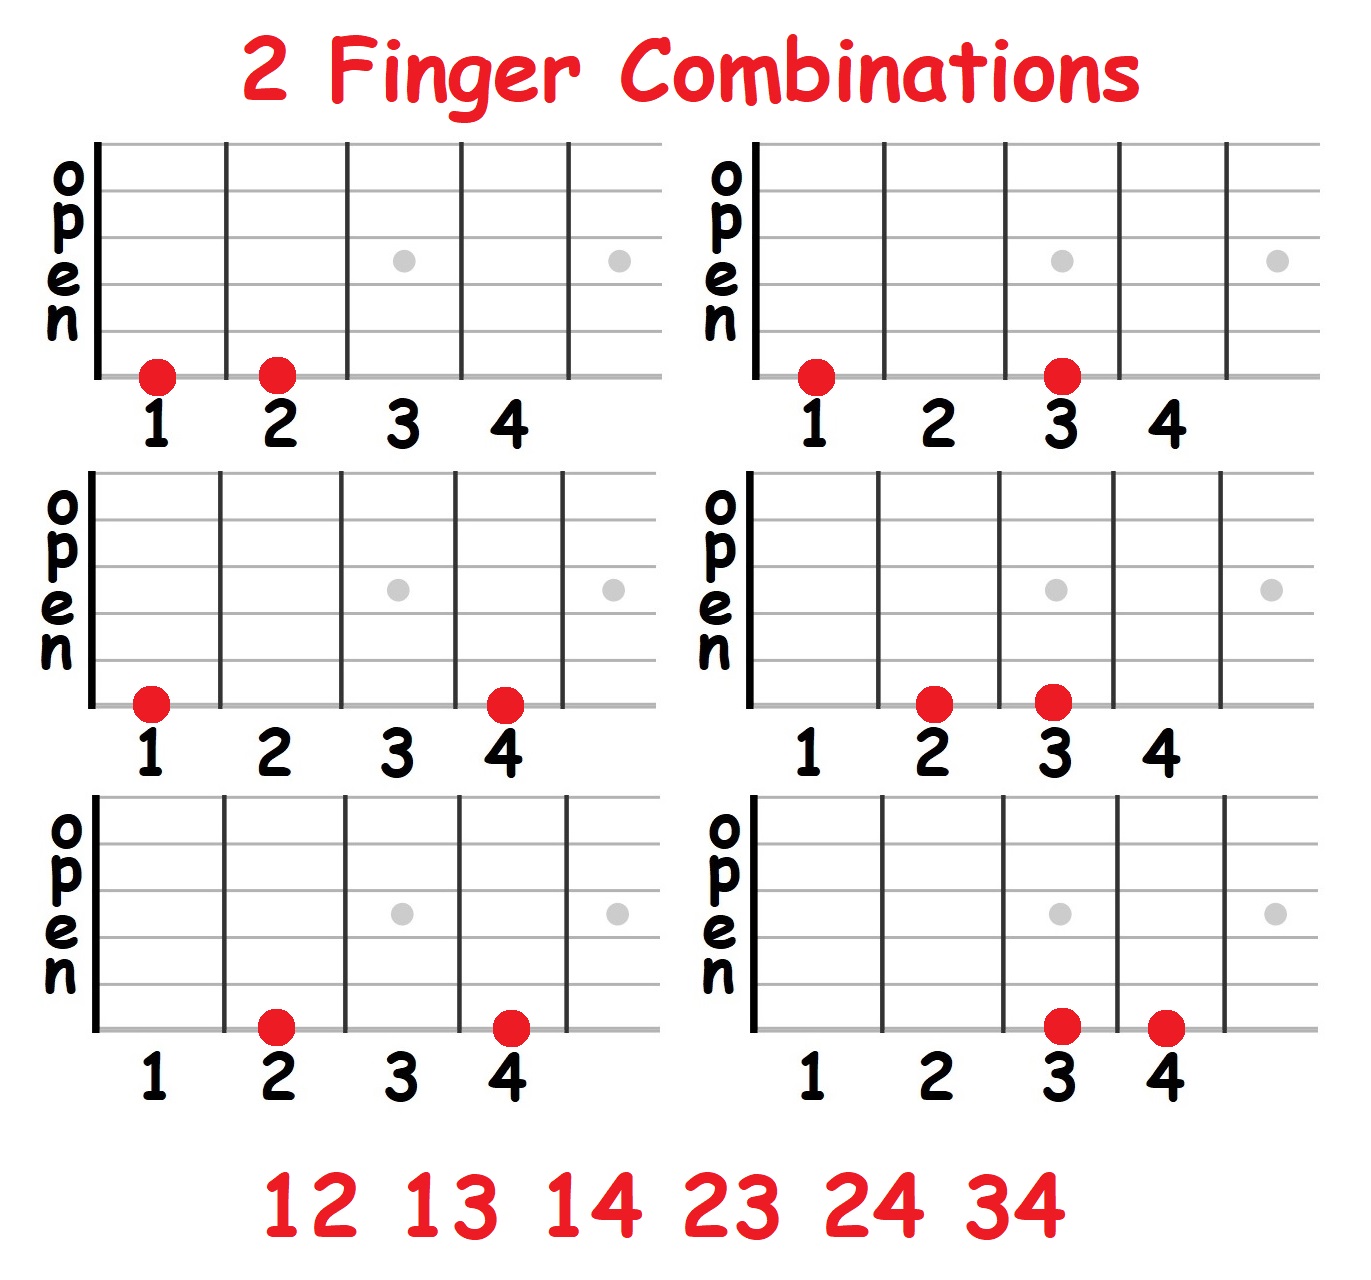
There are only so many combinations of 4. We’re going to play ALL
of the combos, systematically. The combos are . . .
2 finger combos:
12, 13, 14, 23, 24, 34
3 finger combos:
123, 124, 234
Then there is 1 2 3 4. We can break up 1 2 3 4 in a variety of ways!
1 3 2 4, 1 4 2 3, etc.
Every possible scale is made up of the above combinations! So if you can
play them all well, you simply need to know what finger combos are
played in a particular scale to know how to play the scale. More on this
in a bit!
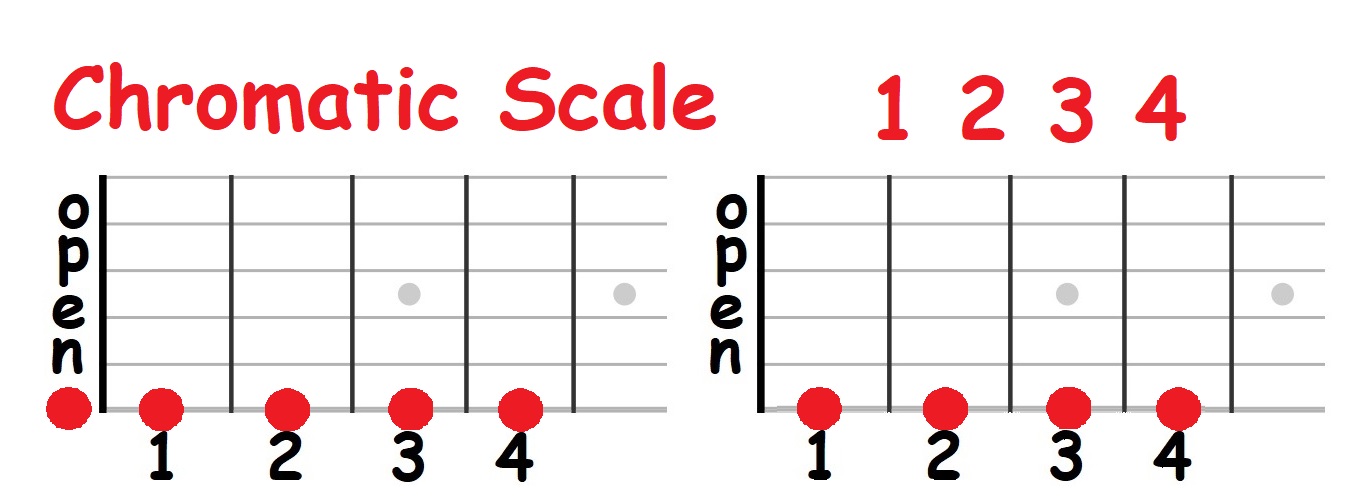
We’ll start by playing the Chromatic Scale. That simply means, we’ll
play a scale that contains ALL of the notes! This is our first warm up!
WEEK 1: Play these every day for a week! Ideally 2 to 3 times a day!
Trust me. As Monk used to say . . . You’ll thank me later!
You’re going to play each string, starting from the low E. Place your
fingers above the 1st 4 frets. One finger over one fret.
For all of these exercises, it’s critically important to use fingers 1 2 3 4
to play frets 1 2 3 4! Do not play fret 3 with finger 4, etc!
You’re simply going to pick the low E string OPEN, then play fret 1,
then fret 2, then 3 then 4. One note at a time. And count Open 1 2 3 4
as you play each note.
Go SLOWLY! Each note needs to be clear, clean. Don’t press too
hard. Just hard enough to get the note to sound clearly.
 Pick up and down, alternately. D U D U D
Each time you play finger/fret 4, you move to the next string. Play
open A 1 2 3 4. Then open D 1 2 3 4 Open G 1 2 3 4 Open B 1 2 3 4
Open high E 1 2 3 4
Then play it in reverse. Just come back down. Play 4 3 2 1 open,
then move back to the B string, 4 3 2 1 open, and continue until
you play low E 4 3 2 1 open.
Do this THREE TIMES! Slowly. THEN . . . move on to the combos
as follows. This was your warm up!
The count is 1 2 3 4 5 because there are 5 notes played per string.
The audio uses a 5 count before you start playing.
Also, the audio playes 5 times, not 3. Up to you!
Each time it plays, it gets slightly faster.
You can listen online, or click the 3 vertical dots
on the audio player, right side, then select download.
You can also slow the track down if it's too fast.
Click the play button below to play a sample O1234 MP3.
~
2 Finger Combos: 1&2 Play frets 1 & 2 using fingers 1 & 2 on each string,
starting on low E. Count 12 A string) 12 D 12 G 12 B12 high E 12.
Then come back down. High E 21 B 21 G 21 D 21 A 21 low E 21
Do this 3 times! Then move to combo 2. 2&3.
Pick up and down, alternately. D U D U D
Each time you play finger/fret 4, you move to the next string. Play
open A 1 2 3 4. Then open D 1 2 3 4 Open G 1 2 3 4 Open B 1 2 3 4
Open high E 1 2 3 4
Then play it in reverse. Just come back down. Play 4 3 2 1 open,
then move back to the B string, 4 3 2 1 open, and continue until
you play low E 4 3 2 1 open.
Do this THREE TIMES! Slowly. THEN . . . move on to the combos
as follows. This was your warm up!
The count is 1 2 3 4 5 because there are 5 notes played per string.
The audio uses a 5 count before you start playing.
Also, the audio playes 5 times, not 3. Up to you!
Each time it plays, it gets slightly faster.
You can listen online, or click the 3 vertical dots
on the audio player, right side, then select download.
You can also slow the track down if it's too fast.
Click the play button below to play a sample O1234 MP3.
~
2 Finger Combos: 1&2 Play frets 1 & 2 using fingers 1 & 2 on each string,
starting on low E. Count 12 A string) 12 D 12 G 12 B12 high E 12.
Then come back down. High E 21 B 21 G 21 D 21 A 21 low E 21
Do this 3 times! Then move to combo 2. 2&3.
 ~
Shake out your left hand. Get it loose again!
Now play 1 & 3! Same way! From low E, play fingers/frets 13 on
each string going up. Then revere it and play 31 on each string.
~
Shake out your left hand. Get it loose again!
Now do the same with 1 & 4. Play 14 on each string going up, and
41 playing back down!
~
Shake out your left hand. Get it loose again!
Now we do the finger 2 combos! We already did 1 & 2. So . . .
Play fingers 2 & 3 on frets 2 & 3. E 23 A 23 D 23 G 23 B 23 high E 23
Then play it in reverse as above. High E 32 B 32 G 32 D 32 A 32 low E 32
~
Shake out your left hand. Get it loose again!
Play fingers 2 & 4, same way!
~
Shake out your left hand. Get it loose again!
Last, play 3 & 4 the same way! DO ALL OF THESE 3 TIMES!
~
Now we’ll do the 3 finger combos! Starting with 123.
~
Shake out your left hand. Get it loose again!
Now play 1 & 3! Same way! From low E, play fingers/frets 13 on
each string going up. Then revere it and play 31 on each string.
~
Shake out your left hand. Get it loose again!
Now do the same with 1 & 4. Play 14 on each string going up, and
41 playing back down!
~
Shake out your left hand. Get it loose again!
Now we do the finger 2 combos! We already did 1 & 2. So . . .
Play fingers 2 & 3 on frets 2 & 3. E 23 A 23 D 23 G 23 B 23 high E 23
Then play it in reverse as above. High E 32 B 32 G 32 D 32 A 32 low E 32
~
Shake out your left hand. Get it loose again!
Play fingers 2 & 4, same way!
~
Shake out your left hand. Get it loose again!
Last, play 3 & 4 the same way! DO ALL OF THESE 3 TIMES!
~
Now we’ll do the 3 finger combos! Starting with 123.
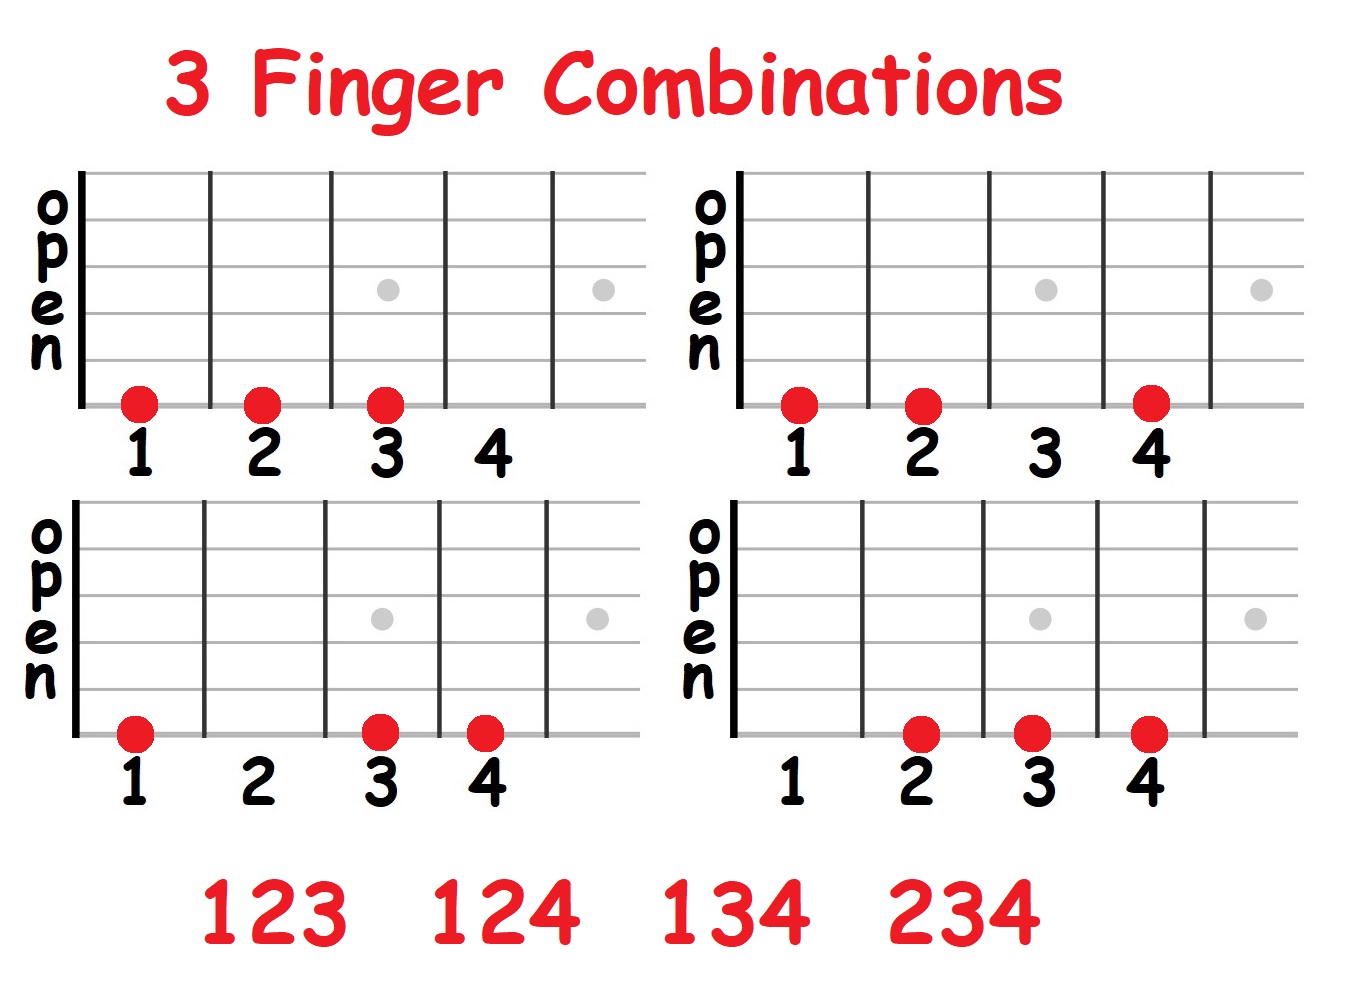 Play 123 on each string going up, then 321 coming back down.
Play 1 2 4 the same way.
Play 1 3 4
Then 234.
Shake out your left hand. Get it loose again!
Now the last one. This is similar to the warm up Chromatic Scale exercise.
But this time, no open strings! Just play 1234 on each string going up, then
4321 coming back down! DONE
Play 123 on each string going up, then 321 coming back down.
Play 1 2 4 the same way.
Play 1 3 4
Then 234.
Shake out your left hand. Get it loose again!
Now the last one. This is similar to the warm up Chromatic Scale exercise.
But this time, no open strings! Just play 1234 on each string going up, then
4321 coming back down! DONE
NOW LET'S JOIN SOME COMBOS TOGETHER! There is another powerful reason for learning these specific finger exercises. Buy developing the required muscle memory to play all combinations of your four fingers, you have also developed the proper skills to play scales! We're going to play just three of the most used, most common scales in an exercise now. And guess what! You've already BEEN PLAYING scales! Watch this! We're going to play a minor pentatonic scale, then we'll do the major and minor scale. And it's going to be really easy! The pentatonic scale is to lead/single note playing on guitar as the major chord scale is to playing rhythm/chords on guitar! The biggest majority of the solos and fills you hear in the songs you love are all played using one simple 5 note scale! Pentatonic literally means . . . 5 notes. So you learn this shape, and you can later move it to any fret, play in ANY key! F Minor Pentatonic will be the 1st one you play. It's simply one finger combo on each string! And it's on the 1st four frets, right where you've been playing! 6th string: 1 4 5th, 4th and 3rd string: 1 3 2nd and 1st string: 1 4 The whole scale is just 2 of your finger combinations! 1 4 and 1 3! If I wanted to tell you in words, how to play this scale, I would say: 1st fret, play stings 6 through 1 in this pattern: 14 13 13 13 14 14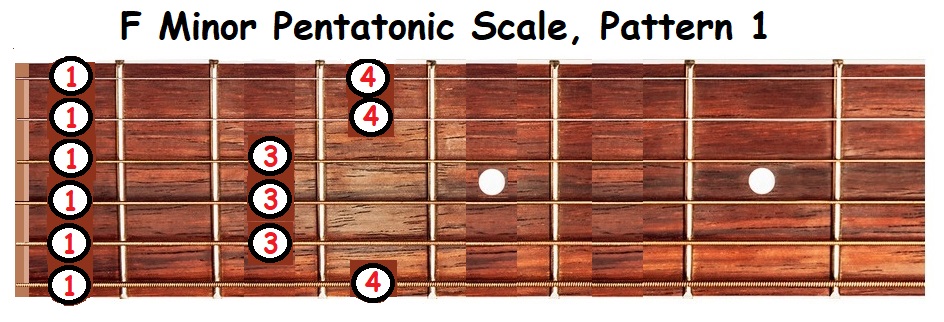 You can right click on the picture, and save it for future reference.
OK, let's play it 5 times.
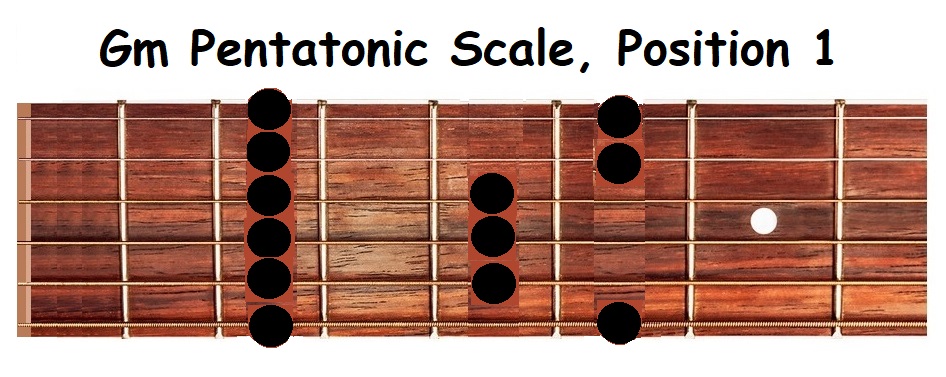
Fm isn't the scale you'd play in the key of G. We did it because
it's in the frets you've been playing. But there is no Fm in the
key of G. Like all chords and all scales, you can play Gm pentatonic
in different positions and shapes up the neck.
Let's venture up the neck, just a little bit! We'll play the same
scale "shape", same pattern as Fm pentatonic, but start on the 3rd
fret. First finger over the 3rd fret, G.
You can right click on the picture, and save it for future reference.
OK, let's play it 5 times.
Fm isn't the scale you'd play in the key of G. We did it because
it's in the frets you've been playing. But there is no Fm in the
key of G. Like all chords and all scales, you can play Gm pentatonic
in different positions and shapes up the neck.
Let's venture up the neck, just a little bit! We'll play the same
scale "shape", same pattern as Fm pentatonic, but start on the 3rd
fret. First finger over the 3rd fret, G.
 Cool! When you venture into playing some solo, lead guitar, this
is the 1st scale you'll be using! But we use the scale for more
than soloing! We also use it to add filles inbetween chord changes!
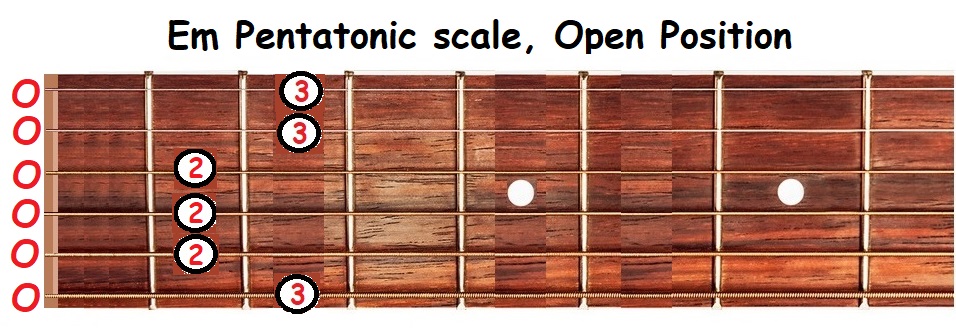
So, now we're going to play an Open Em Pentatonic! Using some open
strings! You'll be using this scale to play in the key of G, AND
playing in the key of Em! The key is G, and each key has a minor
that uses the same notes and chords as it's relative major. Called
the Relative Minor! G and Em use the same scales! Have the same
exact notes! So . . .
This is actually the same shape, same pattern as the other two.
But you effectively slide down one fret from the Fm Penta scale.
So, now the open string takes the place of finger 1.
Play Open 3, O 2, O 2, O 2, O 3, O 3
Cool! When you venture into playing some solo, lead guitar, this
is the 1st scale you'll be using! But we use the scale for more
than soloing! We also use it to add filles inbetween chord changes!
So, now we're going to play an Open Em Pentatonic! Using some open
strings! You'll be using this scale to play in the key of G, AND
playing in the key of Em! The key is G, and each key has a minor
that uses the same notes and chords as it's relative major. Called
the Relative Minor! G and Em use the same scales! Have the same
exact notes! So . . .
This is actually the same shape, same pattern as the other two.
But you effectively slide down one fret from the Fm Penta scale.
So, now the open string takes the place of finger 1.
Play Open 3, O 2, O 2, O 2, O 3, O 3
 This is a fun scale to play. As you play it, you'll probably
think of songs that have it as a hook! Like Little Sister by
Elvis, Shakin' All Over, by the Guess Who, Rumble by Link Wray!
Listen to it played high to low a few different ways. Sound familiar?
I won't go into detail about this right now. Just know that this
pentatonic shape can be used with major AND minor chords!
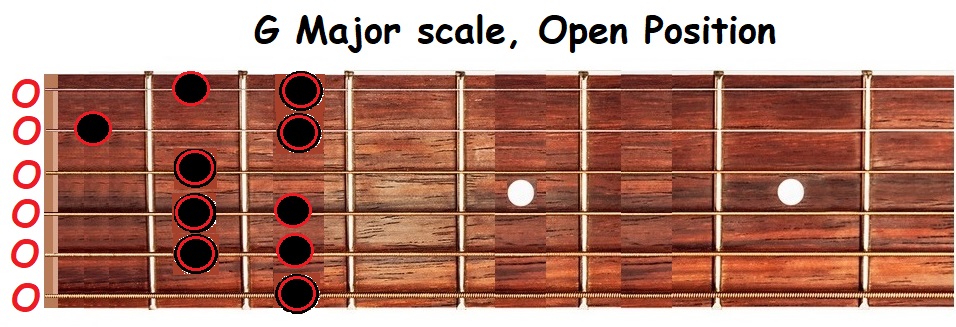
And that leaves us with two more scales to add to this routine!
They're needed for a complete work out in G! The G Major Scale!
Yeah, the old Do Re Mi thing! All I need to tell you right now
is the finger combinations, right! One octave for now.
3
O 2 3 (Open 2 3)
O 2 3
O 2
O 1 3
O 2 3
This is a fun scale to play. As you play it, you'll probably
think of songs that have it as a hook! Like Little Sister by
Elvis, Shakin' All Over, by the Guess Who, Rumble by Link Wray!
Listen to it played high to low a few different ways. Sound familiar?
I won't go into detail about this right now. Just know that this
pentatonic shape can be used with major AND minor chords!
And that leaves us with two more scales to add to this routine!
They're needed for a complete work out in G! The G Major Scale!
Yeah, the old Do Re Mi thing! All I need to tell you right now
is the finger combinations, right! One octave for now.
3
O 2 3 (Open 2 3)
O 2 3
O 2
O 1 3
O 2 3
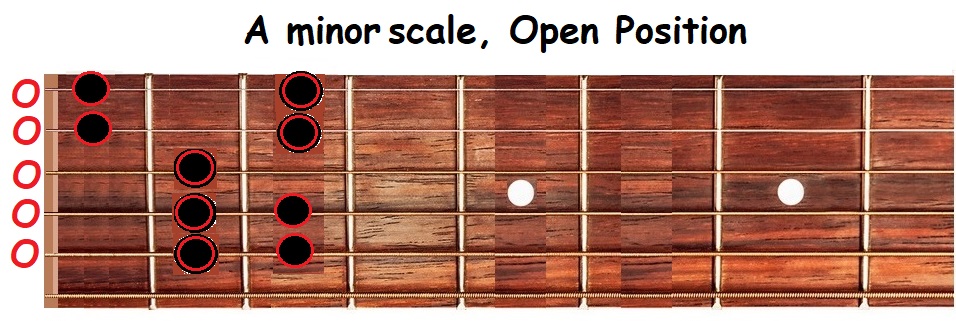
 And lastly, one minor scale! Am open position! This one is a
PLUS because it's also a C major scale! So it's also a two'fer!
X Don't play E string (For now!) 1 octave
E X
O 2 3 (Open 2 3)
O 2 3
O 2
O 1 3
O 1 3
And lastly, one minor scale! Am open position! This one is a
PLUS because it's also a C major scale! So it's also a two'fer!
X Don't play E string (For now!) 1 octave
E X
O 2 3 (Open 2 3)
O 2 3
O 2
O 1 3
O 1 3
 Phew! Lots of stuff here! But a chunk at a time, a day at a time,
and within only a few months, I absolutely guarantee, I promise!
In 90 days, give or take, your playing will be so significantly,
dynamically better, not only YOU will notice! But . . .
EVERYONE WHO HEARS YOU WILL NOTICE! Because you have improved . . .
DRAMATICALLY! Plus, you'll be playing dozens and dozens of songs!
Probably more than 100!
THERE IS A TUTORIAL ON MY SITE:
Learn How To Play 100s of Songs With the Chords You Know Now
This tutorial shows you exactly how to find 100s of songs, with the
lyrics and chords, online! For FREE!
I personally prefer E-Chords.com If you pay for the premium account,
you can download or print the songs, AND there is a transposer!
All you do is type in the song title. When it comes up, if it's not
in the key you want, click the transposer and select the key you want!
Go back to Wayne's Corner and click on the guitar tutorials link!
It's a quick read! And withing minutes, you'll have a dozen or more
songs to practice! Using the chords you know!
Spend a few more minutes, get another dozen!
You can easily build a library of 100 or more songs withing a bit
more than an hour! 100s of songs!
There is a downloadable Routine Sheet you can follow. But to review,
you played . . .
Open 1 2 3 4 on each string going up, 4 3 2 1 open coming back down.
Then combos 12, 13, 14, 23, 24, 34 . . . 123 124 234 And 1234.
Fm Pentatonic, position 1. and Gm, and Em pentatonic. Plus G major!
You need to do these once or twice (ideally 3) times a day for about a
week or so. You’re going to start feeling muscles you didn’t know you
had! When your hand tightens up, just shake it loose. Not HARD. Just
shake it and get it loose.
But you NEED to do this a BUNCH of times in a 1 week period of time!
Get the motion down! Get the notes clean! Keep playing this SLOWLY!
Week 2: You’re going to do the same identical exercise, with ONE
exception! There is ONE added step, at the very beginning! Your
fingers should start toughening up by now. Maybe still a bit tender!
NOTE: If your fingers are more than a bit sore, if they burn a bit, then
just continue exactly as you did in week one! By the next week, you’ll
notice a big difference! Then move on to WEEK 2!
One extra step added to WEEK 2. Do this before you start the routine!
Just do the 1234 exercise FIRST, but like this!
Go a bit more slowly! And press a little harder for each note, and hold it
for a count of a slow 3. 1 – 2 – 3. Then release and go to the next note.
Don’t press hard! Just a bit harder, firmer than usual Play this on each
string, up and down, 3 times.
Then, shake it off! And start the routine from the beginning as usual!
When you finished, do the press one again, just one more time, up and down!
WEEKs 3&4: This week is just like the last. Start with the “press” exercise,
3 times. Do the rest of the routine. And end with the press, one more time!
OK, now we’re going to step it up! But first you must make an honest self-
evaluation! You must determine whether or not you have improved noticeably!
Are you able to get through the entire routine noticeably more easily than when
you started? Can you play each note, all of them, clearly and cleanly?
If not, then repeat week 2! Take one more week. Then move on to WEEK 3.
This is why it’s important for the 1st 4 weeks to play these DAILY! After
that, you’ll just be playing the routine before each regular practice session!
OK, WEEK 3 is a bit different. By now, your fingers are getting a bit tougher,
AND stronger! You can do the whole routine fairly well. And it takes you
less time than when you started. Keep in mind, each time we add more to
the routine, it adds a little time. But after several sessions, that time just
“goes away!” After several sessions, you’ll get through the entire routine
in much less time!
OK, now we get to work. You do WEEK 3 the same way, as in, each string,
up, then in reverse back down. But now it’s gonna start preparing you for
something you’ve wanted for a long time. To become a better player!
Each exercise, you do the same thing with one addition! You start with the
1st 4 frets as usual. But each time you get back to the low E string, and play
that string, you move up ONE fret, and do the same exercise again! And
continue doing that up to the 7th fret.
So, now you’re not doing each one 3 times! Only once. On each string!
But you’re doing each exercise on more frets!
After you do the regular “press” warm up, you do the 12 as usual.
On frets 1 and 2. Then, when you finish, just one time, slide up one
fret, and play it again on frets 2 and 3!
Then up again, play it on frets 3 and 4! Then 4 and 5. 5 and 6. 6 and 7.
Then finally, 7 and 8. THEN . . . back down, playing in reverse! Play
frets 87, 76, 65, 54, 43, 32 and 21. PLAY THEM ON EACH STRING
ONCE!
Go on to the next one. 13. All strings, up to fret 7, back down! Do all
of the exercises the same way. Give this one TWO weeks! Do it the
same way every day!
Now you’re going to start seeing results DAILY! IMPROVEMENTS
in your picking, articulation! The notes will start to sound cleaner,
clearer! Probably not perfect! But it will be in time! Week 5 is going
to make it all start working on AUTO-PILOT!
WEEK 5 (I guess it’s really week 5!) The only difference in week 5 is,
instead of moving up to the 7th fret, you’re going to play all frets, up
to the 12th fret! No other changes!
After this week, go back one day and do it like you did in week 1.
Evaluate! Are you able to play it much more easily now? YES!
Does it sound better, cleaner and clearer? YES! Did it take a LOT
LESS TIME to play it than when you started? YES!
By now the routine, well, THIS part of the routine has become, well,
routine! You do it on auto-pilot. And THIS will always be the 1st
part of every practice session!
When you first started on week 1, this seemed like drudgery! Brutal.
Just getting through the warm up was tough! But guess what? The whole
thing is now . . . your warm up! From today, until forever!
WEEK 5 IS YOUR WARM UP! From now, until forever!
OK, that’s it for Part 1. The finger exercises! Now some magic starts!
Because not only have your fingers toughened up, and gotten stronger,
your picking has improved! Your fingers find each fret more easily! AND
your pick is hitting the sweet spot more often!
This will improve EVERYTHING you do on guitar. But once you add
the 1st chord exercises to your routine . . . HOLY SMOKES! Wait
until you’ve done them for just ONE WEEK!
Here’s the download link for the text copy of just the actual routine,
and ALL of the audio files. It's a ZIP file. Download it to a folder
that's handy! You'll be in the folder a lot! Until you have the routine
down pat, and don't need the files!
ZIP file with all audio files and text practice chart.
Phew! Lots of stuff here! But a chunk at a time, a day at a time,
and within only a few months, I absolutely guarantee, I promise!
In 90 days, give or take, your playing will be so significantly,
dynamically better, not only YOU will notice! But . . .
EVERYONE WHO HEARS YOU WILL NOTICE! Because you have improved . . .
DRAMATICALLY! Plus, you'll be playing dozens and dozens of songs!
Probably more than 100!
THERE IS A TUTORIAL ON MY SITE:
Learn How To Play 100s of Songs With the Chords You Know Now
This tutorial shows you exactly how to find 100s of songs, with the
lyrics and chords, online! For FREE!
I personally prefer E-Chords.com If you pay for the premium account,
you can download or print the songs, AND there is a transposer!
All you do is type in the song title. When it comes up, if it's not
in the key you want, click the transposer and select the key you want!
Go back to Wayne's Corner and click on the guitar tutorials link!
It's a quick read! And withing minutes, you'll have a dozen or more
songs to practice! Using the chords you know!
Spend a few more minutes, get another dozen!
You can easily build a library of 100 or more songs withing a bit
more than an hour! 100s of songs!
There is a downloadable Routine Sheet you can follow. But to review,
you played . . .
Open 1 2 3 4 on each string going up, 4 3 2 1 open coming back down.
Then combos 12, 13, 14, 23, 24, 34 . . . 123 124 234 And 1234.
Fm Pentatonic, position 1. and Gm, and Em pentatonic. Plus G major!
You need to do these once or twice (ideally 3) times a day for about a
week or so. You’re going to start feeling muscles you didn’t know you
had! When your hand tightens up, just shake it loose. Not HARD. Just
shake it and get it loose.
But you NEED to do this a BUNCH of times in a 1 week period of time!
Get the motion down! Get the notes clean! Keep playing this SLOWLY!
Week 2: You’re going to do the same identical exercise, with ONE
exception! There is ONE added step, at the very beginning! Your
fingers should start toughening up by now. Maybe still a bit tender!
NOTE: If your fingers are more than a bit sore, if they burn a bit, then
just continue exactly as you did in week one! By the next week, you’ll
notice a big difference! Then move on to WEEK 2!
One extra step added to WEEK 2. Do this before you start the routine!
Just do the 1234 exercise FIRST, but like this!
Go a bit more slowly! And press a little harder for each note, and hold it
for a count of a slow 3. 1 – 2 – 3. Then release and go to the next note.
Don’t press hard! Just a bit harder, firmer than usual Play this on each
string, up and down, 3 times.
Then, shake it off! And start the routine from the beginning as usual!
When you finished, do the press one again, just one more time, up and down!
WEEKs 3&4: This week is just like the last. Start with the “press” exercise,
3 times. Do the rest of the routine. And end with the press, one more time!
OK, now we’re going to step it up! But first you must make an honest self-
evaluation! You must determine whether or not you have improved noticeably!
Are you able to get through the entire routine noticeably more easily than when
you started? Can you play each note, all of them, clearly and cleanly?
If not, then repeat week 2! Take one more week. Then move on to WEEK 3.
This is why it’s important for the 1st 4 weeks to play these DAILY! After
that, you’ll just be playing the routine before each regular practice session!
OK, WEEK 3 is a bit different. By now, your fingers are getting a bit tougher,
AND stronger! You can do the whole routine fairly well. And it takes you
less time than when you started. Keep in mind, each time we add more to
the routine, it adds a little time. But after several sessions, that time just
“goes away!” After several sessions, you’ll get through the entire routine
in much less time!
OK, now we get to work. You do WEEK 3 the same way, as in, each string,
up, then in reverse back down. But now it’s gonna start preparing you for
something you’ve wanted for a long time. To become a better player!
Each exercise, you do the same thing with one addition! You start with the
1st 4 frets as usual. But each time you get back to the low E string, and play
that string, you move up ONE fret, and do the same exercise again! And
continue doing that up to the 7th fret.
So, now you’re not doing each one 3 times! Only once. On each string!
But you’re doing each exercise on more frets!
After you do the regular “press” warm up, you do the 12 as usual.
On frets 1 and 2. Then, when you finish, just one time, slide up one
fret, and play it again on frets 2 and 3!
Then up again, play it on frets 3 and 4! Then 4 and 5. 5 and 6. 6 and 7.
Then finally, 7 and 8. THEN . . . back down, playing in reverse! Play
frets 87, 76, 65, 54, 43, 32 and 21. PLAY THEM ON EACH STRING
ONCE!
Go on to the next one. 13. All strings, up to fret 7, back down! Do all
of the exercises the same way. Give this one TWO weeks! Do it the
same way every day!
Now you’re going to start seeing results DAILY! IMPROVEMENTS
in your picking, articulation! The notes will start to sound cleaner,
clearer! Probably not perfect! But it will be in time! Week 5 is going
to make it all start working on AUTO-PILOT!
WEEK 5 (I guess it’s really week 5!) The only difference in week 5 is,
instead of moving up to the 7th fret, you’re going to play all frets, up
to the 12th fret! No other changes!
After this week, go back one day and do it like you did in week 1.
Evaluate! Are you able to play it much more easily now? YES!
Does it sound better, cleaner and clearer? YES! Did it take a LOT
LESS TIME to play it than when you started? YES!
By now the routine, well, THIS part of the routine has become, well,
routine! You do it on auto-pilot. And THIS will always be the 1st
part of every practice session!
When you first started on week 1, this seemed like drudgery! Brutal.
Just getting through the warm up was tough! But guess what? The whole
thing is now . . . your warm up! From today, until forever!
WEEK 5 IS YOUR WARM UP! From now, until forever!
OK, that’s it for Part 1. The finger exercises! Now some magic starts!
Because not only have your fingers toughened up, and gotten stronger,
your picking has improved! Your fingers find each fret more easily! AND
your pick is hitting the sweet spot more often!
This will improve EVERYTHING you do on guitar. But once you add
the 1st chord exercises to your routine . . . HOLY SMOKES! Wait
until you’ve done them for just ONE WEEK!
Here’s the download link for the text copy of just the actual routine,
and ALL of the audio files. It's a ZIP file. Download it to a folder
that's handy! You'll be in the folder a lot! Until you have the routine
down pat, and don't need the files!
ZIP file with all audio files and text practice chart.
Left Click to "SAVE", Right Click to "SAVE AS"!
Click Here All FILES.zip Click Here
Enjoy! If you like this freebie, please drop me a line
about how it's working for you!
Have at it! Wayne
Hope you find this interesting. If you do, please feel welcome
to drop me a line. Email me, or drop me a PM on Facebook!
Email me any time! ~/~ Wayne on Facebook
Back to the Tutorials Index Page
My Band Website
Check out my Support Group
Performers and Musicians Support Group My main Backing Tracks Support Website with over 43,736+ free bacing tracks! SoundFont, MIDI editors and players and more! 256 WEB PAGES! All distributed for free!
Visit my MidKar website!
Pick up and down, alternately. D U D U D
Each time you play finger/fret 4, you move to the next string. Play
open A 1 2 3 4. Then open D 1 2 3 4 Open G 1 2 3 4 Open B 1 2 3 4
Open high E 1 2 3 4
Then play it in reverse. Just come back down. Play 4 3 2 1 open,
then move back to the B string, 4 3 2 1 open, and continue until
you play low E 4 3 2 1 open.
Do this THREE TIMES! Slowly. THEN . . . move on to the combos
as follows. This was your warm up!
The count is 1 2 3 4 5 because there are 5 notes played per string.
The audio uses a 5 count before you start playing.
Also, the audio playes 5 times, not 3. Up to you!
Each time it plays, it gets slightly faster.
You can listen online, or click the 3 vertical dots
on the audio player, right side, then select download.
You can also slow the track down if it's too fast.
Click the play button below to play a sample O1234 MP3.
~
2 Finger Combos: 1&2 Play frets 1 & 2 using fingers 1 & 2 on each string,
starting on low E. Count 12 A string) 12 D 12 G 12 B12 high E 12.
Then come back down. High E 21 B 21 G 21 D 21 A 21 low E 21
Do this 3 times! Then move to combo 2. 2&3.
~
Shake out your left hand. Get it loose again!
Now play 1 & 3! Same way! From low E, play fingers/frets 13 on
each string going up. Then revere it and play 31 on each string.
~
Shake out your left hand. Get it loose again!
Now do the same with 1 & 4. Play 14 on each string going up, and
41 playing back down!
~
Shake out your left hand. Get it loose again!
Now we do the finger 2 combos! We already did 1 & 2. So . . .
Play fingers 2 & 3 on frets 2 & 3. E 23 A 23 D 23 G 23 B 23 high E 23
Then play it in reverse as above. High E 32 B 32 G 32 D 32 A 32 low E 32
~
Shake out your left hand. Get it loose again!
Play fingers 2 & 4, same way!
~
Shake out your left hand. Get it loose again!
Last, play 3 & 4 the same way! DO ALL OF THESE 3 TIMES!
~
Now we’ll do the 3 finger combos! Starting with 123.
Play 123 on each string going up, then 321 coming back down.
Play 1 2 4 the same way.
Play 1 3 4
Then 234.
Shake out your left hand. Get it loose again!
Now the last one. This is similar to the warm up Chromatic Scale exercise.
But this time, no open strings! Just play 1234 on each string going up, then
4321 coming back down! DONE
NOW LET'S JOIN SOME COMBOS TOGETHER! There is another powerful reason for learning these specific finger exercises. Buy developing the required muscle memory to play all combinations of your four fingers, you have also developed the proper skills to play scales! We're going to play just three of the most used, most common scales in an exercise now. And guess what! You've already BEEN PLAYING scales! Watch this! We're going to play a minor pentatonic scale, then we'll do the major and minor scale. And it's going to be really easy! The pentatonic scale is to lead/single note playing on guitar as the major chord scale is to playing rhythm/chords on guitar! The biggest majority of the solos and fills you hear in the songs you love are all played using one simple 5 note scale! Pentatonic literally means . . . 5 notes. So you learn this shape, and you can later move it to any fret, play in ANY key! F Minor Pentatonic will be the 1st one you play. It's simply one finger combo on each string! And it's on the 1st four frets, right where you've been playing! 6th string: 1 4 5th, 4th and 3rd string: 1 3 2nd and 1st string: 1 4 The whole scale is just 2 of your finger combinations! 1 4 and 1 3! If I wanted to tell you in words, how to play this scale, I would say: 1st fret, play stings 6 through 1 in this pattern: 14 13 13 13 14 14
You can right click on the picture, and save it for future reference.
OK, let's play it 5 times.
Fm isn't the scale you'd play in the key of G. We did it because
it's in the frets you've been playing. But there is no Fm in the
key of G. Like all chords and all scales, you can play Gm pentatonic
in different positions and shapes up the neck.
Let's venture up the neck, just a little bit! We'll play the same
scale "shape", same pattern as Fm pentatonic, but start on the 3rd
fret. First finger over the 3rd fret, G.
Cool! When you venture into playing some solo, lead guitar, this
is the 1st scale you'll be using! But we use the scale for more
than soloing! We also use it to add filles inbetween chord changes!
So, now we're going to play an Open Em Pentatonic! Using some open
strings! You'll be using this scale to play in the key of G, AND
playing in the key of Em! The key is G, and each key has a minor
that uses the same notes and chords as it's relative major. Called
the Relative Minor! G and Em use the same scales! Have the same
exact notes! So . . .
This is actually the same shape, same pattern as the other two.
But you effectively slide down one fret from the Fm Penta scale.
So, now the open string takes the place of finger 1.
Play Open 3, O 2, O 2, O 2, O 3, O 3
This is a fun scale to play. As you play it, you'll probably
think of songs that have it as a hook! Like Little Sister by
Elvis, Shakin' All Over, by the Guess Who, Rumble by Link Wray!
Listen to it played high to low a few different ways. Sound familiar?
I won't go into detail about this right now. Just know that this
pentatonic shape can be used with major AND minor chords!
And that leaves us with two more scales to add to this routine!
They're needed for a complete work out in G! The G Major Scale!
Yeah, the old Do Re Mi thing! All I need to tell you right now
is the finger combinations, right! One octave for now.
3
O 2 3 (Open 2 3)
O 2 3
O 2
O 1 3
O 2 3
And lastly, one minor scale! Am open position! This one is a
PLUS because it's also a C major scale! So it's also a two'fer!
X Don't play E string (For now!) 1 octave
E X
O 2 3 (Open 2 3)
O 2 3
O 2
O 1 3
O 1 3
Phew! Lots of stuff here! But a chunk at a time, a day at a time,
and within only a few months, I absolutely guarantee, I promise!
In 90 days, give or take, your playing will be so significantly,
dynamically better, not only YOU will notice! But . . .
EVERYONE WHO HEARS YOU WILL NOTICE! Because you have improved . . .
DRAMATICALLY! Plus, you'll be playing dozens and dozens of songs!
Probably more than 100!
THERE IS A TUTORIAL ON MY SITE:
Learn How To Play 100s of Songs With the Chords You Know Now
This tutorial shows you exactly how to find 100s of songs, with the
lyrics and chords, online! For FREE!
I personally prefer E-Chords.com If you pay for the premium account,
you can download or print the songs, AND there is a transposer!
All you do is type in the song title. When it comes up, if it's not
in the key you want, click the transposer and select the key you want!
Go back to Wayne's Corner and click on the guitar tutorials link!
It's a quick read! And withing minutes, you'll have a dozen or more
songs to practice! Using the chords you know!
Spend a few more minutes, get another dozen!
You can easily build a library of 100 or more songs withing a bit
more than an hour! 100s of songs!
There is a downloadable Routine Sheet you can follow. But to review,
you played . . .
Open 1 2 3 4 on each string going up, 4 3 2 1 open coming back down.
Then combos 12, 13, 14, 23, 24, 34 . . . 123 124 234 And 1234.
Fm Pentatonic, position 1. and Gm, and Em pentatonic. Plus G major!
You need to do these once or twice (ideally 3) times a day for about a
week or so. You’re going to start feeling muscles you didn’t know you
had! When your hand tightens up, just shake it loose. Not HARD. Just
shake it and get it loose.
But you NEED to do this a BUNCH of times in a 1 week period of time!
Get the motion down! Get the notes clean! Keep playing this SLOWLY!
Week 2: You’re going to do the same identical exercise, with ONE
exception! There is ONE added step, at the very beginning! Your
fingers should start toughening up by now. Maybe still a bit tender!
NOTE: If your fingers are more than a bit sore, if they burn a bit, then
just continue exactly as you did in week one! By the next week, you’ll
notice a big difference! Then move on to WEEK 2!
One extra step added to WEEK 2. Do this before you start the routine!
Just do the 1234 exercise FIRST, but like this!
Go a bit more slowly! And press a little harder for each note, and hold it
for a count of a slow 3. 1 – 2 – 3. Then release and go to the next note.
Don’t press hard! Just a bit harder, firmer than usual Play this on each
string, up and down, 3 times.
Then, shake it off! And start the routine from the beginning as usual!
When you finished, do the press one again, just one more time, up and down!
WEEKs 3&4: This week is just like the last. Start with the “press” exercise,
3 times. Do the rest of the routine. And end with the press, one more time!
OK, now we’re going to step it up! But first you must make an honest self-
evaluation! You must determine whether or not you have improved noticeably!
Are you able to get through the entire routine noticeably more easily than when
you started? Can you play each note, all of them, clearly and cleanly?
If not, then repeat week 2! Take one more week. Then move on to WEEK 3.
This is why it’s important for the 1st 4 weeks to play these DAILY! After
that, you’ll just be playing the routine before each regular practice session!
OK, WEEK 3 is a bit different. By now, your fingers are getting a bit tougher,
AND stronger! You can do the whole routine fairly well. And it takes you
less time than when you started. Keep in mind, each time we add more to
the routine, it adds a little time. But after several sessions, that time just
“goes away!” After several sessions, you’ll get through the entire routine
in much less time!
OK, now we get to work. You do WEEK 3 the same way, as in, each string,
up, then in reverse back down. But now it’s gonna start preparing you for
something you’ve wanted for a long time. To become a better player!
Each exercise, you do the same thing with one addition! You start with the
1st 4 frets as usual. But each time you get back to the low E string, and play
that string, you move up ONE fret, and do the same exercise again! And
continue doing that up to the 7th fret.
So, now you’re not doing each one 3 times! Only once. On each string!
But you’re doing each exercise on more frets!
After you do the regular “press” warm up, you do the 12 as usual.
On frets 1 and 2. Then, when you finish, just one time, slide up one
fret, and play it again on frets 2 and 3!
Then up again, play it on frets 3 and 4! Then 4 and 5. 5 and 6. 6 and 7.
Then finally, 7 and 8. THEN . . . back down, playing in reverse! Play
frets 87, 76, 65, 54, 43, 32 and 21. PLAY THEM ON EACH STRING
ONCE!
Go on to the next one. 13. All strings, up to fret 7, back down! Do all
of the exercises the same way. Give this one TWO weeks! Do it the
same way every day!
Now you’re going to start seeing results DAILY! IMPROVEMENTS
in your picking, articulation! The notes will start to sound cleaner,
clearer! Probably not perfect! But it will be in time! Week 5 is going
to make it all start working on AUTO-PILOT!
WEEK 5 (I guess it’s really week 5!) The only difference in week 5 is,
instead of moving up to the 7th fret, you’re going to play all frets, up
to the 12th fret! No other changes!
After this week, go back one day and do it like you did in week 1.
Evaluate! Are you able to play it much more easily now? YES!
Does it sound better, cleaner and clearer? YES! Did it take a LOT
LESS TIME to play it than when you started? YES!
By now the routine, well, THIS part of the routine has become, well,
routine! You do it on auto-pilot. And THIS will always be the 1st
part of every practice session!
When you first started on week 1, this seemed like drudgery! Brutal.
Just getting through the warm up was tough! But guess what? The whole
thing is now . . . your warm up! From today, until forever!
WEEK 5 IS YOUR WARM UP! From now, until forever!
OK, that’s it for Part 1. The finger exercises! Now some magic starts!
Because not only have your fingers toughened up, and gotten stronger,
your picking has improved! Your fingers find each fret more easily! AND
your pick is hitting the sweet spot more often!
This will improve EVERYTHING you do on guitar. But once you add
the 1st chord exercises to your routine . . . HOLY SMOKES! Wait
until you’ve done them for just ONE WEEK!
Here’s the download link for the text copy of just the actual routine,
and ALL of the audio files. It's a ZIP file. Download it to a folder
that's handy! You'll be in the folder a lot! Until you have the routine
down pat, and don't need the files!
ZIP file with all audio files and text practice chart. Left Click to "SAVE", Right Click to "SAVE AS"!
Click Here All FILES.zip Click Here
Performers and Musicians Support Group My main Backing Tracks Support Website with over 43,736+ free bacing tracks! SoundFont, MIDI editors and players and more! 256 WEB PAGES! All distributed for free!
Visit my MidKar website!
Please help keep us online with a small donation! This site is free for all. The tutorials, workshops. 43,813 MIDI, KAR & BIAB backing tracks files, 23 BIAB User Styles. A FREE SoundFont, Timbres of Heaven. Free MIDI players and editor! The fees for a site this large (Nearly 200 pages with over 50K files) is pretty high, as you can imagine. Please consider making a small donation to help keep us online. It would help so much! Thanks! Wayne PS: I pay for the site and all hosting, security and domain related expenses out of pocket. Donations appreciated. Please click the link below.